The Art of Depth: Mastering the 3D Butterfly Mandala with Layered Digital Cut Files
In the ever-evolving landscape of digital crafting, few projects capture the imagination quite like the 3D Butterfly Mandala. This intricate design is more than just a decorative piece; it is a testament to the power of layered art, transforming flat digital files into breathtaking three-dimensional sculptures. Whether you are a seasoned crafter looking to expand your portfolio or a beginner eager to dive into the world of Cricut and Silhouette machines, understanding the mechanics and beauty of this project is essential. By combining the organic elegance of butterflies with the geometric precision of mandalas, this Butterfly Layered Art offers a unique blend of nature and mathematics that appeals to a wide audience.
Understanding the Concept: From Flat to Three-Dimensional
At its core, a mandala is a spiritual and ritual symbol in Hinduism and Buddhism, representing the universe. However, in modern craft, the term has evolved to describe any circular design with radial symmetry. When we introduce the "3D" element, we are no longer talking about a single sheet of paper. We are discussing a technique known as layering, where multiple cut pieces are stacked on top of one another to create depth, shadow, and dimension.
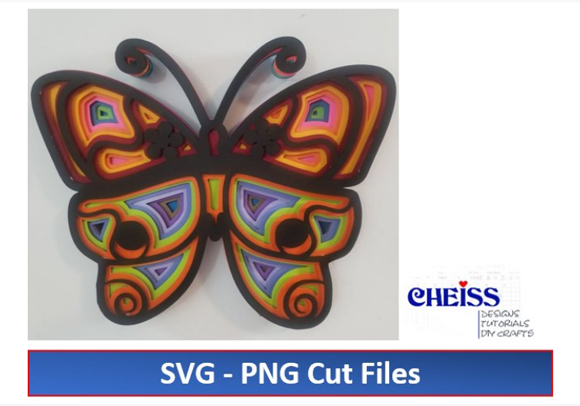
The 3D Butterfly Mandala takes this concept further by integrating the butterfly motif—a universal symbol of transformation and freedom—into the concentric rings of the mandala. Each layer serves a specific purpose. The bottom layers often form the structural base, while the upper layers feature delicate wing patterns that seem to float above the canvas. This creates a visual effect where the eye is drawn inward, following the spiraling wings from the center outwards. For those who appreciate both artistic expression and technical precision, this project is the perfect intersection of creativity and engineering.
Why Choose Layered Design Over Single-Cut Projects?
Many beginners wonder why they should invest time in an eight-layer project when a single-cut silhouette is quicker. The answer lies in the impact. A single-cut image is flat and two-dimensional. While beautiful, it lacks presence. A layered design, however, interacts with light. As shadows fall between the layers, the artwork gains a dynamic quality that changes depending on the viewing angle and lighting conditions. This makes Butterfly Layered Art particularly effective for wall decor, where it can serve as a focal point in a room, adding texture and sophistication without the need for physical frames or glass.
Technical Specifications and File Formats
One of the most significant advantages of purchasing a digital download for this type of project is the versatility of the file formats provided. Typically, these downloads come as a comprehensive zip folder containing both SVG and PNG files, ensuring compatibility with almost all major cutting machines.
- SVG (Scalable Vector Graphics): This is the gold standard for cutting machines like the Cricut Maker, Cricut Explore, and Silhouette Cameo. SVG files are vector-based, meaning they can be resized infinitely without losing quality. The file included in our package is pre-separated into distinct layers, allowing you to control the size and color of each individual ring or wing segment before cutting.
- PNG (Portable Network Graphics): These raster images are invaluable for printing purposes. If you plan to use a printer rather than a cutter, or if you want to create a mockup of your design before committing to expensive cardstock, PNG files provide high-resolution visuals with transparent backgrounds.
By receiving a zip folder that includes instructions alongside these files, users are not left guessing. The digital nature of the product means you have instant access to the tools needed to start creating immediately, without waiting for shipping or dealing with physical inventory.
Selecting the Right Materials for Success
While the digital files are the blueprint, the material you choose will determine the final aesthetic and durability of your 3D Butterfly Mandala. The reference pictures for this design typically utilize 65-pound cardstock. But why this specific weight? Cardstock weights generally range from 65lb to 110lb. Lighter papers (like standard copy paper at 20lb) lack the stiffness required to hold their shape when stacked, causing the layers to sag or curl. Heavier papers (over 100lb) can be difficult to cut cleanly with some machine blades and may require excessive pressure settings that could damage your cutting mat.
65-pound cardstock strikes the perfect balance. It is sturdy enough to maintain the structural integrity of the eight layers but flexible enough to allow for clean cuts around the intricate curves of the butterfly wings. Additionally, this weight allows for easy handling during the assembly process. Beginners might find it helpful to experiment with different colors to see how contrast affects the visibility of the layers. Using a dark background layer with lighter foreground wings can make the butterfly appear to glow, while using monochromatic shades creates a subtle, elegant gradient effect.
The Importance of the Eight-Layer Structure
The specific design of this mandala utilizes eight distinct layers. This number is not arbitrary; it is calculated to provide sufficient depth without making the final piece too bulky or heavy. Too few layers result in a flat appearance, while too many can make the center dense and cluttered. The eight-layer structure allows for:
- Base Stability: The bottom two layers provide a solid foundation.
- Mid-Range Detail: The middle layers build the bulk of the mandala’s pattern.
- Foreground Drama: The top three layers feature the most detailed butterfly elements, which stand out prominently against the background.
Step-by-Step Assembly: Bringing the Mandala to Life
Receiving the digital download is only the first step. The true magic happens during assembly. The zip folder includes a link to step-by-step instructions, but understanding the general workflow helps demystify the process.
1. Preparation and Cutting: Load your cardstock into your Cricut or Silhouette machine. Ensure your blade is sharp; dull blades can tear the edges of the 65-pound cardstock, ruining the crisp look of the mandala. Cut each layer separately or use the "weeding" technique to remove excess material carefully.
2. Alignment: This is the most critical phase. Misalignment can cause the butterfly wings to look crooked or uneven. Use a registration mark or a center punch tool to ensure every layer is perfectly centered. Many crafters use a small dot of glue stick or double-sided tape on the very back of each layer to temporarily hold it in place while they align the next one.
3. Adhesion: Once aligned, apply adhesive to the back of each layer. Foam adhesive squares are highly recommended for this project. Unlike flat glue, foam pads add an extra millimeter of height between layers, enhancing the 3D effect and preventing the layers from sticking together completely. This separation allows light to pass through, creating natural shadows.
4. Final Mounting: After stacking all eight layers, mount the finished mandala onto a backing board. You can leave it open-faced for a modern look or frame it behind glass. If framing, ensure there is enough depth in the frame to accommodate the thickness of the layered paper.
Practical Applications: Home, Office, and Gifting
The versatility of the 3D Butterfly Mandala makes it suitable for various settings. In a home environment, it serves as an excellent conversation starter. Its intricate details reward close inspection, making it perfect for entryways, living rooms, or bedrooms. The butterfly motif adds a touch of serenity and natural beauty, promoting a calming atmosphere.
For office spaces, this art piece can inspire creativity and focus. The mandala’s symmetrical nature is psychologically soothing, potentially reducing stress for employees or clients. Placing a large-scale version in a lobby or a smaller one on a desk adds a professional yet personal touch.
Furthermore, this project makes for a thoughtful and unique gift. Instead of buying generic store-bought decor, gifting a completed 3D Butterfly Mandala shows effort and appreciation for art. It is particularly well-received by butterfly lovers, gardeners, or anyone who appreciates handmade crafts. The digital nature of the source file also means you can customize colors to match the recipient’s favorite palette, adding a personalized touch that mass-produced items cannot offer.
Common Misconceptions and Tips for Beginners
A common misconception is that 3D layered art requires expensive equipment. While a cutting machine like a Cricut simplifies the process significantly, it is not strictly necessary if you have steady hands and a craft knife. However, the SVG files are optimized for machine cutting, which ensures consistency across all eight layers—a task that is incredibly tedious to do by hand.
Another assumption is that the process is too complex for novices. While layering requires patience, the included instructions break down the process into manageable steps. The key is to take your time during the alignment phase. Rushing this step is the most common cause of frustration. Remember, the goal is not perfection but expression. Slight imperfections can add character to handmade items.
Conclusion
The 3D Butterfly Mandala is more than just a craft project; it is a journey into the world of layered design. By leveraging the precision of SVG files and the tactile beauty of cardstock, you can create a stunning piece of art that bridges the gap between digital technology and traditional craftsmanship. Whether you are decorating your home, enhancing your workspace, or sharing your skills with others, this eight-layer masterpiece offers endless possibilities for creativity. With the right materials, a bit of patience, and the guidance provided in the digital download, you can transform simple sheets of paper into a vibrant, three-dimensional celebration of nature’s beauty.